

5 Microsoft Excel tips and tricks

Microsoft Excel has always been a great tool to do data analysis. In today’s tech and data-driven world, the ability to analyze data has never been more important.
Here are five ways to more quickly access commands, make your data set better, apply some formatting and visualize data.
STOP clicking through menus and tabs and START using shortcuts
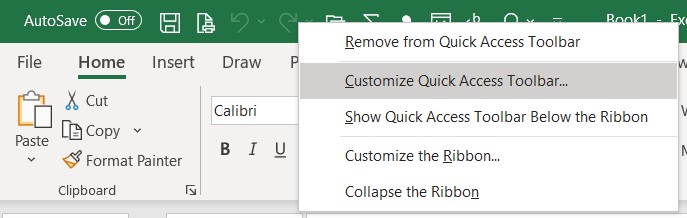
The feature allows you to pin items to your quick access toolbar at the top of your Excel window. To add a button to the toolbar, simply right click it and choose “Add to Quick Access Toolbar,” as shown below.

After you add a few buttons, you will have a full menu of your frequently used features at your disposal. This approach also comes in very handy when accessing commands that aren’t easily “seen” in the default menu, meaning that you have to navigate to the proper ribbon tab and then click a drop down, and sometimes another drop down from there.
By customizing your quick access toolbar, you can save yourself a lot of “clicks” and the time and frustration that comes along with clicking that mouse.
![]()
STOP closing out of your Excel files, opening a new email and navigating through subfolders to attach the document and START using the “Send to Mail Recipient” shortcut within the document
I used to click 8-10 times to send an email with an Excel file attachment. Now that you know how to customize your quick access toolbar, you can also add a function to send the current Excel file you are accessing as an email attachment with one single click.
See below for steps to follow:
- Right click on any of your existing quick access toolbar icons at the top of your ribbon and select “Customize Quick Access Toolbar.”
- Change the dropdown at the top to “All Commands” and scroll down to “Send to Mail Recipient.” Select that option and click “Add >>” and then “OK.”
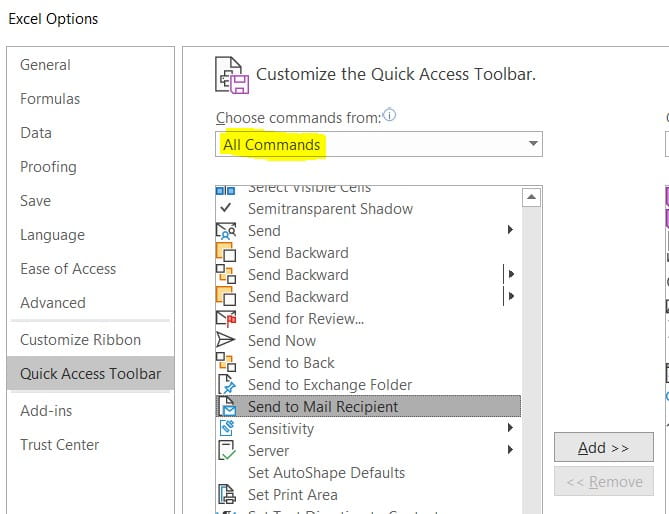
That’s it! Now you can send Excel files via email with one single click.
The first time you use it, you will also note that there is an option to send the entire document or simply the active sheet. This can be very helpful if you have a document with multiple tabs but you only want the mail recipient to have access to view a single tab.
STOP leaving your tables unformatted and START applying table formats
The feature allows you to quickly format your table. It also makes your formulas easier to use.

STOP leaving data-only tables in your report and START using some easy-to-insert graphs
On your pivot table, you can click on PivotChart to easily insert some tables that relate to your table. As you adjust your pivot table, the chart will also change.

Bonus tip: An advanced formula for the Excel power users
STOP using Vlookups and start using Index / Match
Often times, you are in a table and need to get data from another table. Vlookups require you to count columns and have the column to match first in the set, and they generally cause a slowdown when using them. Using Index(Match()) allows the data to sit anywhere in the table. Let’s take a look at how to use it.
Assume you have an Excel file with two tables; one contains information about your customers and another about your sales associates.
Table 1
| Account Number | Account Name | Sales Leader |
|---|---|---|
| 12345 | ABC Co | Bill Bean |
Table 2
| Sales leader | Location | Team Name |
|---|---|---|
| Bill Bean | Oakland, CA | A |
Let’s assume table 1 has thousands of rows and we would like to pull in the location and the team name into table 1 from table 2. We will also assume we have formatted our tables as Excel tables, named both Table1 and Table2.
In table 1, column D, the formula will read
=INDEX(Table2[Location],MATCH([@Sales Leader],Table2[Sales Leader],0))
In table 1, column E, the formula will read
=INDEX(Table2[Team Name],MATCH([@Sales Leader],Table2[Sales Leader],0))
This will give us a final result of:
| Account Number | Account Name | Sales Leader | Location | Team Name |
|---|---|---|---|---|
| 12345 | ABC Co | Bill Bean | Oakland, CA | A |
Related content:

